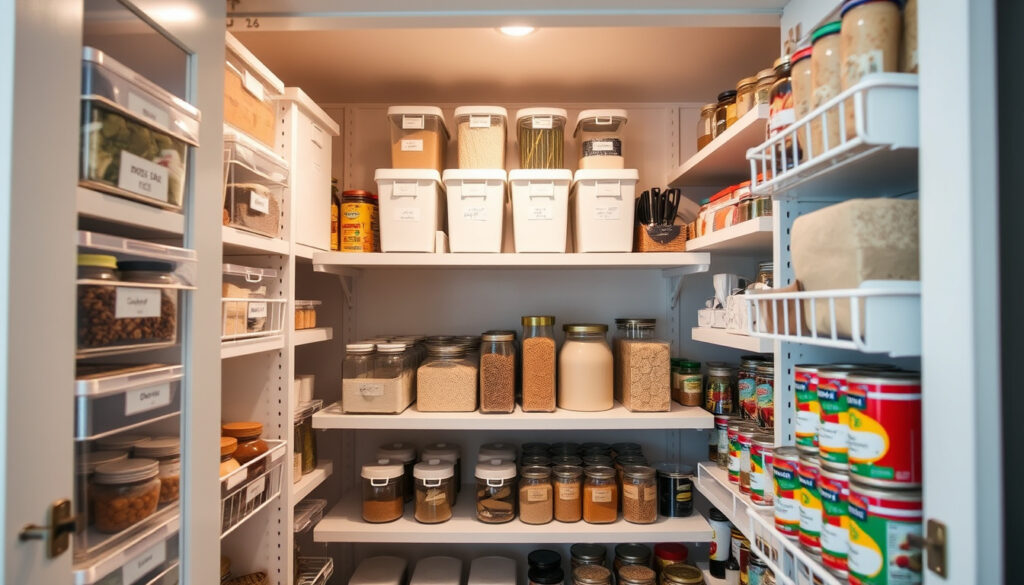
How to Organize Kitchen Pantry: 7 Zones & IKEA Hacks
Open your pantry after a chaotic week and it’s a familiar scene — things shoved wherever they fit, half-empty bags of pasta, and that one jar you have no idea when you bought. This guide walks through 7 pantry zones, IKEA hacks for deep shelves, and the mistakes that make organizing fall apart fast.
Pantry Zones: 7 · Cabinet Organization Steps: 10 · Food52 Tips: 4 core steps · Common Mistakes: Design and storage errors
Quick snapshot
- 7 dedicated zones (IKEA US pantry guide)
- Category grouping (IKEA US pantry guide)
- Daily access priority (IKEA US pantry guide)
- Simple storage products (IKEA US pantry guide)
- Deep shelf solutions (IKEA US pantry guide)
- Affordable organizers (IKEA US pantry guide)
- Avoid overload (I Heart Organizing)
- Label all items (I Heart Organizing)
- Use vertical space (I Heart Organizing)
- Clear bins (IKEA US pantry guide)
- Pull-outs (IKEA US pantry guide)
- Declutter first (IKEA US pantry guide)
The table below consolidates the core principles that anchor every zone decision and product choice mentioned in this guide.
| Label | Value |
|---|---|
| Ideal Zones | 7 pantry zones |
| Core Steps | Declutter, containerize, label |
| Shelf Rule | Heavy bottom, light top |
| IKEA Products | UPPDATERA, UTRUSTA, KORALLVIPPA |
| Deep Shelf Fix | Pull-out drawers or sliding trays |
| Labeling Priority | Every container, every zone |
What is the best way to organize a kitchen pantry?
The most effective approach starts with decluttering before anything else — pull everything out, toss expired items, and keep only what you actually use. Once the field is clear, group items by category and invest in clear containers so nothing hides at the back of a shelf. Labeling every bin and zone completes the system so anyone in the household can find things without a hunt.
Declutter first
Empty the entire pantry and sort everything into three piles: keep, donate, and discard. According to Just a Girl and Her Blog (home organization specialist), this step reveals how many duplicate items have accumulated — often three or more open bags of the same grain. A clean slate makes zoning logical rather than just shuffling clutter into nicer containers.
- Discard expired food, dented cans, and stale spices
- Donate unopened items your household won’t eat
- Measure shelf dimensions before buying containers
Use clear containers
Transparent storage lets you spot the last cup of flour without opening every lid. IKEA’s official pantry guide recommends the KORALLVIPPA jar line specifically for dry goods like salt, sugar, and flour — their clear bodies eliminate guessing. Stackable IKEA 365+ boxes work similarly for snacks, baking supplies, and cereals, keeping contents visible while maximizing shelf real estate.
Clear containers cost more upfront but pay back in reduced food waste — you actually eat what you buy because you can see it.
Label everything
Every container gets a label, whether it’s a printed sticker or a simple piece of masking tape with marker. The visual cue keeps family members from defaulting to “I’ll just put it back wherever.” IKEA’s guide specifically calls out labeled baskets sorted by category — baking, breakfast, snacks — as a system that survives daily use. Pair labels with consistent container shapes so refills look neat without re-labeling every time.
What are the 7 pantry zones?
A zone-based pantry assigns each category its own territory, cutting search time and preventing the mix-and-match mess that happens when everything shares one shelf. Just a Girl and Her Blog emphasizes grouping like items — baking supplies together, snacks on another shelf — so replenishing inventory happens shelf by shelf rather than across the whole space.
Baking zone
Flour, sugar, baking powder, chocolate chips, and extract bottles live here. Store these in airtight clear jars or stackable boxes so you can grab a measuring cup without digging. Risers on deeper shelves elevate smaller items like extract bottles so nothing gets buried at the back.
- Flour, sugar, brown sugar, powdered sugar
- Baking soda and baking powder
- Chocolate chips, coconut, dried fruit
- Vanilla, almond extract, espresso powder
Snacks zone
Chips, crackers, nuts, and granola bars go here — ideally in clear bins rather than their original packaging so shelves stay neat. IKEA’s US pantry guide recommends labeled baskets for this zone specifically, making it easy to rotate without reorganizing the whole pantry.
Canned goods zone
Soup cans, beans, tomatoes, and other shelf-stable staples belong in their own zone — preferably on a lower shelf where heavy items are easier to lift. Stack cans by type (soups together, beans together) so inventory checks take seconds.
How do you decide where to put things in kitchen cabinets?
Placement follows two rules: frequency of use and physical reality. Items grabbed daily belong at waist height in base cabinets or at eye level on shelves — never in deep cabinets requiring a reach into the dark. Heavy items like canned goods or appliances go on lower shelves; lighter items like snack boxes go higher. IKEA’s pantry organization guide calls this the “heavy bottom, light top” rule as a simple anchor for any cabinet layout.
Prioritize daily use items
Coffee, cereal, commonly cooked grains, and everyday condiments should be the first things visible when the door opens. I Heart Organizing (home organization blog, March 2018) recommends categorizing by frequency: everyday items at the front for easy reach, overflow or backup stock pushed to the back or upper shelves. This single habit cuts morning scramble time significantly.
Heavy items on bottom
Base cabinets with drawers accommodate heavy items better than open shelves because drawers bring contents forward. The IKEA SEKTION cabinet system paired with MAXIMERA drawers handles this well — medium-sized drawers organized by category beat one large drawer for finding things quickly. Upper cabinets work for light snack boxes, spare containers, or seasonal items.
Follow the 10-step process
A logical 10-step process keeps placement decisions consistent rather than arbitrary:
- Empty and clean all shelves
- Sort everything into categories
- Discard expired items
- Group duplicates
- Measure every shelf and cabinet
- Choose containers that fit dimensions
- Assign zones based on category
- Place heaviest items lowest
- Label every container
- Test for one week, then adjust
The biggest failure point is skipping step 10 — most pantries fall apart within two weeks without a check-in. A Sunday afternoon review keeps the system alive.
What are pantry design mistakes to avoid?
Several design choices undermine even the most determined organizer, creating frustration that leads to abandoning the system entirely. Common mistakes include fixed shelving that blocks access, poor lighting that hides expired items, wire shelving without containment, and skipping labels. I Heart Organizing identifies fixed shelves in deep cabinets as the single most common organizational failure — they force you to build “walls of tins” with no way to reach the back row.
Overloading shelves
Cramming too many items onto one shelf defeats the visibility advantage of clear containers. When you can’t see the jar’s contents, you buy duplicates at the store. Keep each shelf to one category with breathing room — a crowded baking shelf means flour, sugar, and chocolate chips compete for space and nothing gets retrieved cleanly.
Poor lighting
Deep pantries and corner cabinets suffer from shadowed shelves that hide expired items until they become science experiments. Add a battery-powered LED puck light inside dark cabinets, or choose a transparent or white-backed cabinet door to let light through. The goal: spot an expired can without squinting.
No labeling
Unlabeled containers only work if one person uses the pantry. The moment a partner, roommate, or child returns an item to the wrong spot, the zone system breaks. Labels don’t need to be fancy — masking tape with a Sharpie works — but they must exist on every container, basket, and shelf divider.
The pattern: the deepest the cabinet, the more critical the pull-out or tray system becomes — otherwise the back row becomes permanent dead storage.
How to organize a pantry with deep shelves?
Deep shelves — those 18 to 24-inch depths common in IKEA cabinets — create hidden zones where items vanish unless you build retrieval systems into the design. IKEA’s US pantry guide recommends installing narrower adjustable shelves inside deep cabinets so items sit higher up and stay reachable rather than forming an inaccessible row of tins.
Pull-out drawers
Drawers transform deep cabinets from black holes into accessible storage. The MAXIMERA drawer system from IKEA pulls contents all the way forward, eliminating the need to reach into shadows. I Heart Organizing calls this the single most valuable upgrade for deep pantry spaces: “Add drawers whenever possible to utilize front-to-back space in deep pantries and bring back items forward.”
- MAXIMERA medium drawers organize by category
- UTRUSTA pull-out wire baskets for narrow spaces
- UTRUSTA corner carousels for awkward L-shaped corners
IKEA solutions
IKEA’s product lineup addresses deep shelf challenges directly. The table below maps each product to its primary deep-shelf function.
| Product | Use |
|---|---|
| UTRUSTA corner carousels | Transform wasted corner space into accessible storage with a simple spin |
| UTRUSTA pull-out wire baskets | Narrow baskets fit beside fridges or in tight corners |
| UPPDATERA drawer dividers | Separate spices, utensils, and small items in drawer spaces |
| Sliding trays and adjustable shelves | Reach all corners without removing front items |
Small pantry adaptations
Small pantries face the same deep-shelf problems at smaller scale. Just a Girl and Her Blog recommends trays that act like pull-out drawers — place a tray on the shelf, load it with items, and slide the tray forward rather than digging. Risers maximize vertical space on deeper shelves, elevating spices and cans so shorter items sit in front without burial.
Pull-out systems and UTRUSTA products add cost — estimates put a basic IKEA pantry organization setup at $60-65 for bins, dividers, and tray inserts. The investment pays back in reduced food waste and daily frustration.
Abby Lawson (Blogger, Just a Girl and Her Blog)
“Trays are excellent to use in deeper pantries. This way nothing has to be moved, and the tray acts almost like a drawer.”
IKEA (Official Guide)
“Install narrower shelves in deep cabinets: Store items higher up without creating a wall of tins.”
Related reading: IKEA Pantry Organization Guide
Frequently asked questions
What is the 3×4 kitchen rule?
The 3×4 rule assigns zones by frequency: everyday items get 3 best spots (eye level, waist height, front of shelf), while occasional items get 4 lower-priority spots (upper shelves, back rows, deep cabinets). This keeps grab-and-go items maximally accessible while backup stock stays organized but secondary.
How to organize pantry by category?
Group items by type — baking supplies together, snacks on another shelf, canned goods on their own level. Use clear containers and labels so every item has a clear home. Place taller items at the back of each shelf with shorter items in front so nothing hides behind anything else.
How to organize pantry without containers?
Wire shelving and open shelves work if you use tiered risers, lazy Susans, and baskets instead of full containers. Lay spices flat in drawers so labels face up, and use stackable bins without lids for quick access. The key is preventing items from sliding to the back — risers and trays solve this without expensive container systems.
What are IKEA pantry organization ideas?
IKEA’s approach uses their SEKTION cabinet system as the base, then adds MAXIMERA drawers for accessibility, UTRUSTA pull-out baskets for corners and narrow spaces, UPPDATERA dividers for spice drawers, and KORALLVIPPA or IKEA 365+ containers for dry goods visibility. Their official guides walk through the combination step by step.
How to organize a small pantry?
Clear bins, pull-out trays, and aggressive decluttering are non-negotiable in tight spaces. Every inch counts, so use vertical risers, hang clip-on baskets on interior doors, and store infrequently used items elsewhere if possible. The goal is maximum visibility — if you can’t see it, you won’t use it.
What are walk-in pantry organization ideas?
Walk-in pantries allow floor-to-ceiling zones: everyday items at chest height, heavy bulk goods lower, and seasonal or backup stock up high. Use all wall space with floor-to-ceiling shelving, add a small island or table if space allows for packing lunches or sorting groceries, and keep a running list on the door so household members can mark what needs restocking.
How to keep pantry organized long-term?
A weekly 10-minute check-in prevents buildup. Before grocery shopping, review what expired, what ran low, and whether zones still make sense. Adjust one shelf per week rather than trying to reorganize everything at once. The system survives only through consistent maintenance — empty shelves stay neat only when everyone returns items to their labeled homes.
For homeowners stuck with deep IKEA cabinets, the path forward is clear: add pull-out systems like MAXIMERA drawers or UTRUSTA wire baskets, or retrofit deep shelves with sliding trays and risers that let you access the back row without excavating the front. The investment — roughly $60-65 for a basic setup of bins, dividers, and tray inserts — pays back in eliminated frustration and reduced food waste the moment you stop buying duplicates of hidden items.
More related posts
 Climate Voucher 2025 Redeem: Claim $400 in Singapore
 Best Retirement Plan Singapore: CPF LIFE & Annuity Guide
 English to Malayalam Translation: Best Tools, Tips & Grammar Guide
 FairPrice Xtra VivoCity Photos, Location & Products Guide
 Singapore Pools Technical Disruption: Double Payouts Explained
 Delhi to Singapore Flights: Price, Time & Visa Tips 2026
 Bukit Timah Family Clinic: Services, Costs & Location
